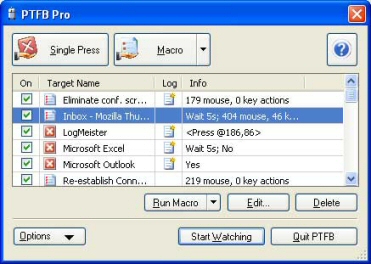
The main window gives you fast access to PTFB Pro's key functions. It is displayed on the first run after installation, and thereafter by clicking on PTFB Pro's tray icon. The window starts out at its smallest possible size - don't forget that you can resize it using any of the standard Windows methods.
The various controls on the main window are described below. In its default configuration, hovering the mouse over any of these controls will display a helpful tooltip. Once you become experienced in using PTFB pro, you may wish to disable the tooltips - for details please read PTFB Pro Configuration.
Click this if you want to create a new item that performs a single button press in a target window. It's the quickest way to get PTFB to dismiss unwanted confirmation messages and other irritations.
When you click this button, the cursor turns to a hand with an outstretched finger. Just move that finger directly over the button you want PTFB Pro to press and click again to create the new entry, or right-click (or hit the Escape key) to cancel.
For more details see Automating Button Pushing.
Use this to create an entry that will carry out a series of mouse and/or keyboard actions on a window. Creating a window-based macro is a two-stage process:
PTFB Pro also supports the creation of a window-less macro, which is handy for certain special applications. To get a choice over the type of macro to create, press the right-hand side of the macro button, or click the Options button and select from the New Macro sub-menu.
For more details see Recording and Playback of Macros.
When you first use PTFB Pro, all the macro and single-press items you create are held together in a single group. If you create additional groups then PTFB Pro displays a row of tabs above the list, to let you switch from one group to another. You can also force PTFB Pro to show the tab bar regardless of how many tabs (groups) there are.
For more information, please see the section on Organizing Macros and Single-Press Items into Groups.
The list box shows the macro and single-press items you have defined, and has various columns as described below. You can resize columns by dragging the dividers on the list header, and re-order columns by clicking and dragging column headers to the left or right.
By default, the list is sorted automatically to preserve alphabetical order. If you disable automatic sorting (see the section on PTFB Pro Configuration) you can order the list manually using drag and drop. You can also create new groups to help manage the items you create - for more information see the section on Organizing Macros and Single-Press Items into Groups.
The list allows more than one item to be selected, which makes it easier to move or delete multiple items in one go. You can also toggle multiple items on/off by selecting the items in question and tapping the space bar on your keyboard. To select multiple items, hold down the shift key (for contiguous selection) or ctrl key (for non-contiguous selection) as you click items in the list. Note however that certain functions (Run Macro, Edit) are only available when a single item is selected.
The list is subdivided into columns as follows:
On: shows whether the item is enabled or disabled - click on the checkbox by each item to toggle its state. This is the master switch for each item; a disabled item will not run no matter what trigger options have been selected.
Target Name: shows the name given to this entry. You can change the default name by selecting the list entry and clicking Edit..., or by double-clicking the item.
Log: indicates if the entry has any notifications (such as logging to text file, sending an email, or running a script or command). The presence of an additional asterisk icon in this column means that the notification may be disabled. For example, the entry may have an email notification, but all emails may be disabled via the PTFB Configuration screen.
Info: shows a little extra information to jog your memory about what the entry does. If the entry has an initial delay before action is taken (which is the default), the entry will start with the word "Wait" followed by an indication of how long the delay is, in seconds. To increase or decrease the delay, select the entry and press "Edit" (see below). You can also change the default delay applied to new entries - please see the section on PTFB Pro Configuration for more details.
Hovering the mouse over the list displays a tooltip with the following information:
- if the mouse is over a cell in the "Target Name" column,
the tooltip displays the full item name and the comment, if any
- if the mouse is over a cell in the Log column, the tooltip displays information
on the item's notifications, if any
- if the mouse is over a cell in the Info column, the tooltip displays
the stock text from the underlying list cell, plus information about the various
trigger options,
including any assigned hotkey
You can disable the tooltips if you wish - please see the section on PTFB Pro Configuration for more details.
This is only available when PTFB's main window is open, and an enabled macro is selected in the list. It causes the macro to run immediately, regardless of what trigger options are set. Clicking the right-hand side of the button presents further options as follows.
Run Multiple Times: This runs the selected macro a given number of times in rapid succession. As an example, imagine you were doing a repetitive editing task on each line of a text file or spreadsheet. You could record a macro as you perform the task on the first line, then use Run Multiple to apply the macro to the remaining lines.
Set Hotkey: You can define a hotkey for the Run Macro function, allowing you to trigger the selected macro manually even when PTFB's window is obscured by others.
Clear Hotkey: Cancels the hotkey for the Run Macro function. The key sequence is now free to be used elsewhere in PTFB, or in other programs.
This is only available when an item is selected in the list box. When clicked it displays properties for the selected item, allowing you to change the delay before PTFB Pro takes action, make target identification more/less strict, and so on. Double-clicking on a list entry has the same effect as selecting the entry and clicking Edit. For more details, please read Tweaking the Settings for single press entries, or the equivalent section for macros.
When one or more items are selected in the list, click Delete to remove them permanently. You will be asked to confirm this action (though you can bypass future confirmations by clicking "Do Not show this again"). Take care when deleting entries - once they're gone, they're gone!
Clicking this button displays the Options menu, giving you access to PTFB Pro's main configuration dialog, links to PTFB Pro's website, and for users of older PTFB versions, a chance to import their existing target entries.
PTFB Pro will not take any automatic action while its main window is on-screen. Clicking "Start Watching" or the close box in the top-right corner closes the main window, minimizing PTFB Pro to the system tray. Once in this state, PTFB Pro is active, and will take appropriate action on any target windows it sees (subject to the trigger options you have set up).
This button, rather than the close box in the top-right corner, is used to quit PTFB Pro. Another way to quit PTFB Pro is to right-click on its tray icon and select Exit from the resulting menu.
This button is only displayed on copies of PTFB Pro that have not yet been fully licensed. Clicking the button gives you details on how to purchase PTFB Pro and enter your license code.
Displays this Help file.
PTFB Pro places a mouse-shaped icon in your system tray when it is running. This icon has a small "x" when PTFB is disabled, and carries a red border (see below) when a macro is playing or when an automated action is about to run.
![]()
Note that Windows XP sometimes hides tray icons to reclaim space for the taskbar. By default, PTFB Pro takes steps to defeat icon hiding. If you wish to change this setting, please open the configuration screen via the Options popup menu.